Hello Happy #4

Well today is a special post. I am publishing my VERY FIRST YouTube Process Video to accompany this layout!

Amy Tan-Finders Keepers & Better Together-Heidi Swapp-Minc

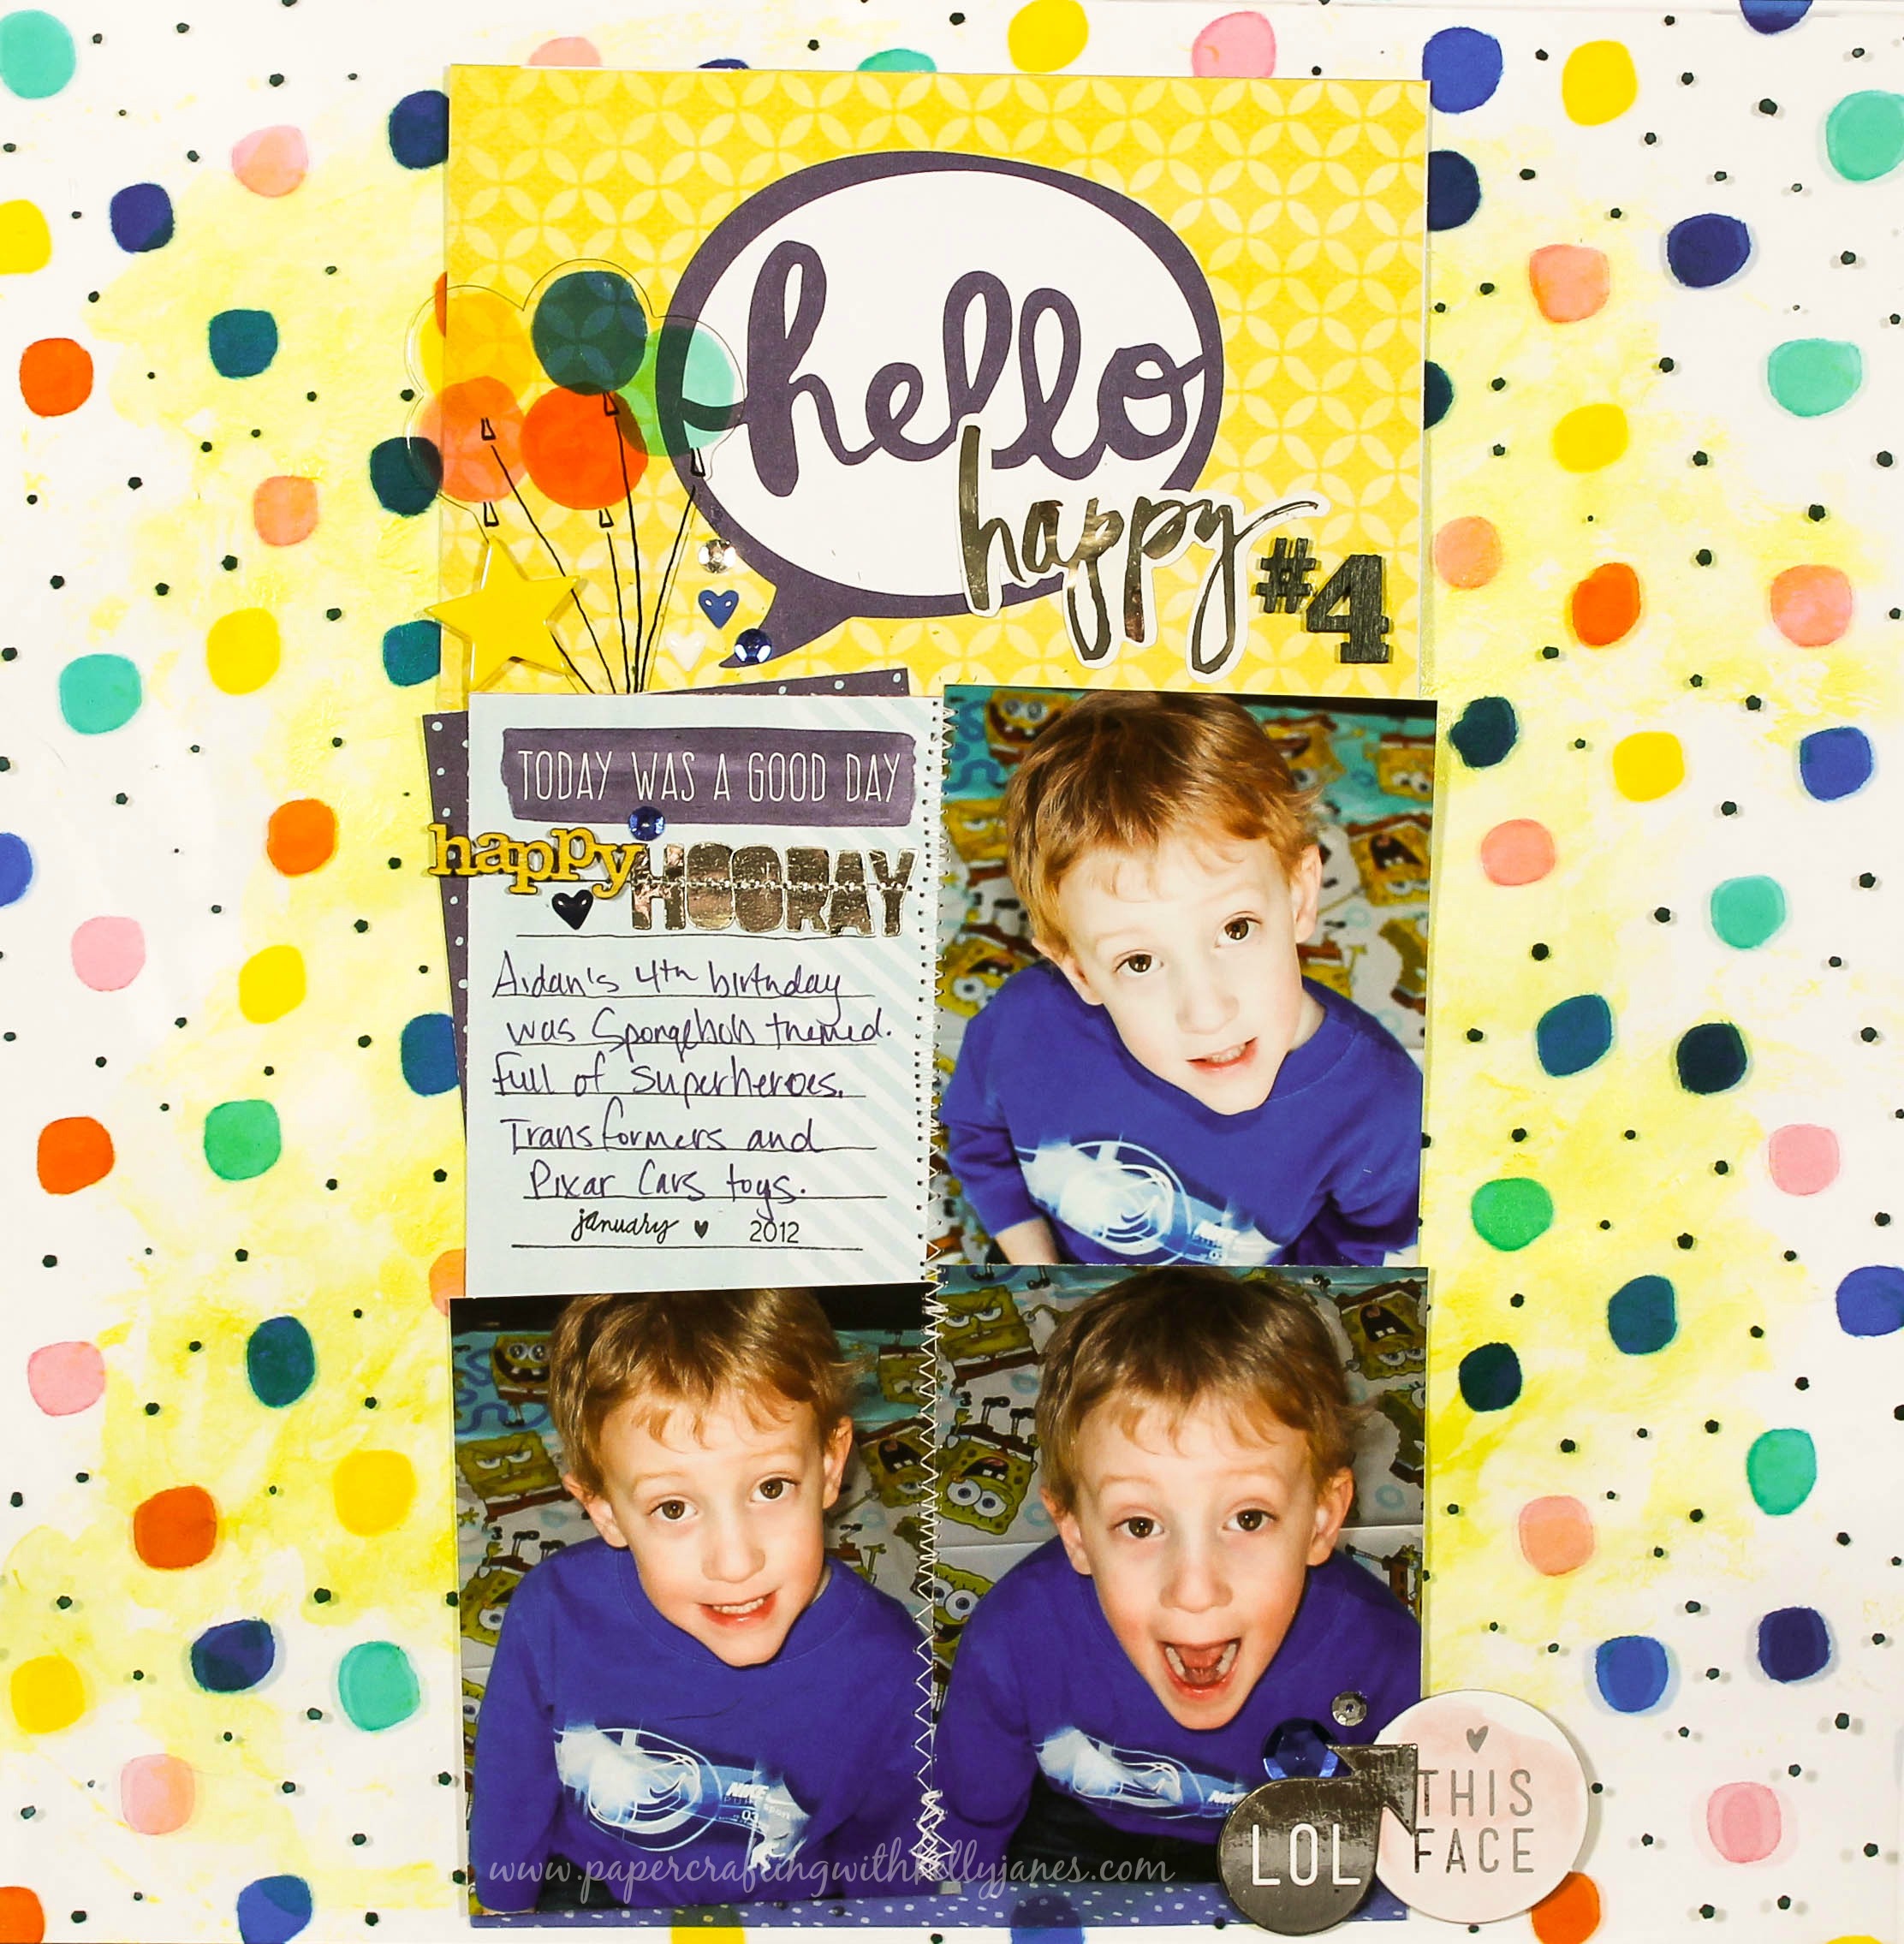
 I started by adding Shimmerz Lemon Drop Dazzlerz to the White Daisy Cardstock background that I prepped with clear gesso. Once the Dazzlerz was dry I added the polka dot acetate sheet from Amy Tan’s Finders Keepers line. I grabbed a few pieces from the cut apart sheet of Amy Tan’s Better Together line and arranged a vertical design straight down the center of the page. The photos I chose for this layout are of my son at his 4th birthday party and I loved the bright bold colors of the Amy Tan lines.

Amy Tan-Finders Keepers & Better Together-Heidi Swapp-Minc

After my photos were adhered to the layout I started looking for embellishments. To make the explaining process simple I’ll start from the top of the layout…On the “Hello” speech bubble paper-I added a Heidi Swapp ephemera “happy” sticker that I silver foiled using my Minc. I love how the hello & happy fonts go together so well! The “#” & “4” are wood veneer pieces from Studio Calico that I painted a dark blue color using Shimmerz Aqua Huez in Blue Moon. I then added the balloons (which I believe are from an Amy Tan collection) and a yellow acrylic star (from Freckled Fawn??).

Amy Tan-Finders Keepers & Better Together-Heidi Swapp-Minc

Now let’s move onto the “Today was a good day” paper…I added the lines to the paper using the CTMH Documenting Moments Stamp Set & CTMH Outdoor Denim Exclusive Ink™. Next I added the Studio Calico wood veneer “Happy” which is painted using the same Lemon Drop Dazzlerz. The “Hooray” is from a Dear Lizzy die that I cut using toner paper and then silver foiled in my Minc. Once I had the papers and photos arranged I added messy stitching along the center of the photos and through the “Hooray”. The stitching adds texture but also is a great way to adhere the acetate sheet to the white cardstock since any adhesive would show through.

Amy Tan-Finders Keepers & Better Together-Heidi Swapp-Minc

The bottom right hand corner has a couple Heidi Swapp Minc chipboard ephemera pieces and I also added a strip of Amy Tan washi to ground my photos at the bottom of the page. I finished off the layout by adding Amy Tan heart enamel dots and a few sequins scattered about. I added my journaling, date stamp and the layout was finished!

Now you can take a look at how this all came together!

Thanks for stopping by!
-Kelly

Mixed Media Blog Hop

marchbloghop

Mixed media! I LOVE MIXED MEDIA! So much so that I try to incorporate a little on each layout, but my project today is full blown mixed media! I hope you’re as excited about our Mixed Media Blog Hop as I am and if you started at the beginning you would have come from Amie Kiger’s blog, but if you’ve started here that is perfect too! Our hop is a circle so even if you’ve started here, you’ll still make it around the entire circle by clicking the link on the bottom of my post. Now let’s jump straight into my layout!

Mixed Media, The Cut Shoppe, Cut Files, Winter Layout

I started with a White Daisy Cardstock base and added a messy layer of black acrylic paint. Once the paint was dry I grabbed a Heidi Swapp polka dot stencil and modeling paste to create the textured pattern. I then added my photo cluster that consists of vellum, Blush Cardstock, and a Hip Kit Club Project Life card. Once I had my photo cluster arranged I moved onto my title. The large letters were originally a wood grain color and didn’t really fit my theme so I grabbed my metallic silver acrylic paint and added multiple layers until I had the coverage I was looking for. The continuation of my title consists of teal, glittery Thickers. I had originally thought I would just put them directly onto the black paint, but they seemed to get a little lost so I added a layer of vellum that also has my journaling. To give a little buffer between the vellum layer and the “EPIC” title, I added a Heidi Swapp acetate banner.

Mixed Media, The Cut Shoppe, Cut Files, Winter Layout

For final touches I cut a few snowflakes & the heart from the Winter Weather Cut File from The Cut Shoppe (I’m also linking this layout to The Cut Shoppe ‘Cut It Out’ March Challenge). I used Distress Ink to color the heart and smushed Clear Glitz (similar to Stickles) onto the snowflakes & under the Warm Hugs cut file to help them shimmer and shine! The acrylic shapes that are scattered about are from a previous kit from the Hip Kit Club. I also added a cute wood veneer heart from Studio Calico.

Mixed Media, The Cut Shoppe, Cut Files, Winter Layout

This is the first layout that I’ve ever created that consists of typed journaling versus handwritten. I’m a big fan of the handwritten journaling because (let’s be honest) I would much rather see the actual handwriting of my great-great grandma than to see a printed out version of her thoughts. It’s my hope that my scrapbooks will be passed through the generations and that my great-great-great grandchildren will be reading about our lives. But after saying all of that… I couldn’t find a good place to house my handwritten journaling. The only place to add it would have been on the sides of the black paint and I knew it would have thrown off the balance to my centrally located vertical design. I could have handwritten it on the vellum but I loved the clean look of the typed text on this very messy layout!

Well that concludes my entry for our blog hop! It’s now time to head to Becca Whitham and I have NO DOUBT that her artwork will be nothing short of amazing! So head there now to see what she has created!

Thanks for stopping by!
-Kelly