‘Tis the Season | The Cut Shoppe

Hello friends!  I have a new layout to share with you that was recently on The Cut Shoppe Blog.

The Cut Shoppe | Tree Farm & 'Tis the Season | Kelly Janes

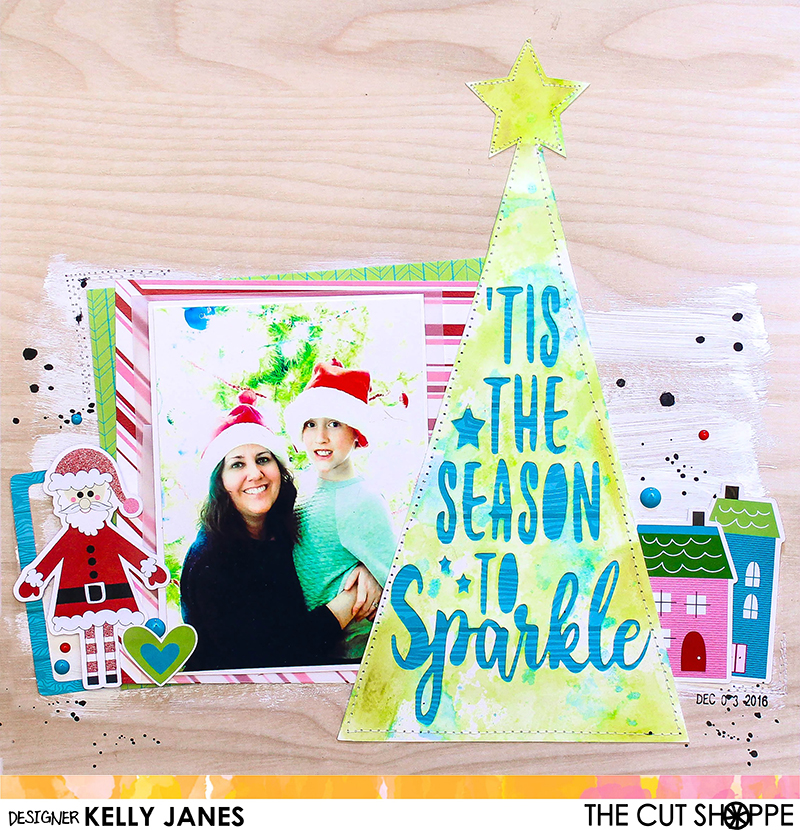
For my layout today I used two cut files from The Cut Shoppe Etsy Store. I used The Tree Farm Cut File and The ‘Tis the Season Cut File.

The Cut Shoppe | Tree Farm & 'Tis the Season

In Cricut Design Space I used the contour feature to make one of the trees from The Tree Farm Cut File into a solid image. Then I took the ‘Tis the Season Cut File and sliced the ‘Tis the Season to Sparkle’ image through the tree. This will allow me to back the sentiment with pattern paper.

The Cut Shoppe | Tree Farm & 'Tis the Season | Kelly Janes

Before I backed the cut file with pattern paper I added color to the tree that is cut on white cardstock using multiple mixed media products including oil pastels, Shimmerz Jeni B Bleu Vibez, and Shimmerz Don’t Citron Me Coloringz.

The Cut Shoppe | Tree Farm & 'Tis the Season | Kelly Janes

The woodgrain background paper is from an older Hip Kit and all of the other pattern papers are from the Pretty Little Studio ‘Tinsel Town Collection’ designed by Ashley Horton. I also used multiple embellishments from that same line including the houses, the frame and the adorable Santa! I wanted to add a little more interest to the background so I used white acrylic paint to add a wash to the background.

The Cut Shoppe | Tree Farm & 'Tis the Season | Kelly Janes

After the paint was dry I adhered everything down to the background paper. I added stitching around the tree, by the photo cluster and also by the house on the bottom right. I also added a sprinkling of enamel dots from My Mind’s Eye in coordinating colors. I wanted to add black splatters but the background paper has a slick feel to it and I was concerned that Black Color Shine wouldn’t soak into the paper. So instead of using Color Shine I mixed black acrylic paint and added splatters using a paintbrush.

I’ve put together a process video that show how this layout came together. It also includes a Cricut Design Space tutorial showing you how I combined the cut files to create the tree on my layout.

MERRY31

Remember today is the final day to take advantage of the sale that is happening at The Cut Shoppe. Be sure to check out all of the amazing cut files and stock up! I hope you all had a very Merry Christmas and a Happy New Year! Thanks for joining me today!

Kelly Janes

Life Skill | Hip Kit Club

Hey crafty friends! I’m back with a new layout for Hip Kit Club using the December 2016 Kits. This is my second layout using the kits and I’m just falling more and more in love with this kit each time I go through the products to create a layout.

|Please note: Portions of the photo and journaling have been blurred for privacy reasons|

Hip Kit Club | December 2016 Kits | Kelly Janes

In Cricut Design Space I created a large title that I cut from my white cardstock base. Before I removed the paper from my cutting mat I used the packaging technique with Glorious Day Vibez from Shimmerz that was included in the October 2016 Color Kit. In the bottle this particular color looks like a mustard yellow color but when you apply it to paper it really is this gorgeous gold!

Hip Kit Club | December 2016 Kits | Kelly Janes

I backed the negative space with the American Crafts Lilac Cardstock from the Cardstock Kit to help the title pop off the page. I hand stitched around each letter using white embroidery floss after I had the purple cardstock fully adhered. This layout is based off of the Hip Kit Club Facebook Forum Sketch #6 and in the sketch the photo is circular. So I used my faux stitched circle dies to cut my photo into a circle. I used fun foam behind the photo to help elevate the photo from the background.

Hip Kit Club | December 2016 Kits | Kelly Janes

I added a few strips of pattern paper from the Main Kit underneath the title. The first paper is actually the manufacturing strip from one of the Pink Paislee-Paige Evans-Take Me Away pattern papers. The second paper is this gorgeous silver foiled polka dot print from Echo Park, and the third is another manufacturing strip from one of the HKC exclusive pattern papers. I love when I’m able to use the manufacturing strips from the pattern papers! It still allows me to add color and pattern to my layouts without having to hack into a full sheet of 12×12 paper.

Hip Kit Club | December 2016 Kits | Kelly Janes

To finish my title I added the word ‘Celebrate’ from the HKC exclusive die cut pack that is included in the Project Life Kit and also used the Thickers from the Main Kit to spell out the word ‘Leader’. This layout is all about the Life Skill Leader Award program at my son’s school. I added all the details in my journaling about how excited Aidan was to receive this award and was something he had been hoping for all year long. We received a letter a week prior to the ceremony letting us know Aidan had been chosen, but that it was a surprise! This photo isn’t of the best quality because it was taken in the gym, which we all know that every gym has TERRIBLE lighting, and we were in the bleachers on the opposite side of the gymnasium. This is a prime example that not every photo has to look professionally done to include it in your scrapbooks. This was a momentous occasion in Aidan’s life and I wanted to be sure it was included in my albums regardless of how well the photo turned out.

Hip Kit Club | December 2016 Kits | Kelly Janes

In the sketch there is also a cluster to the top right hand side of the layout. This portion of the layout is what gave me the most trouble. I couldn’t figure out what papers or embellishments I wanted to use. I knew that I wanted to add a bit of black to the cluster to help create a visual triangle, but other than that I wasn’t sure what to do. I ended up fussy cutting one of the purple strips from the watercolor rainbow pattern papers from the Take Me Away Collection. I also added a couple of Take Me Away ephemera pieces from the Main Kit and another exclusive die cut from the Project Life Kit.

Hip Kit Club | December 2016 Kits | Kelly Janes

For final touches I added a few sequins from the Pink Paislee-Birthday Bash-Sequin Confetti that is included in the Main Kit and one of the exclusive acrylic stars from the Project Life Kit.

I’ve put together a process video that includes a Cricut Design Space tutorial showing you how I created the title for my background.

Remember to head over to the HKC Facebook Forum to check out the sketch and the other Design Team girls interpretations. You don’t have to be a HKC subscriber to join us in the Forum so what are you waiting for? Thank you so much for joining me today!

kelly-janes-01