Boo | The Cut Shoppe

Hey there friends! I’m back with a new Halloween themed layout that was recently on The Cut Shoppe Blog.

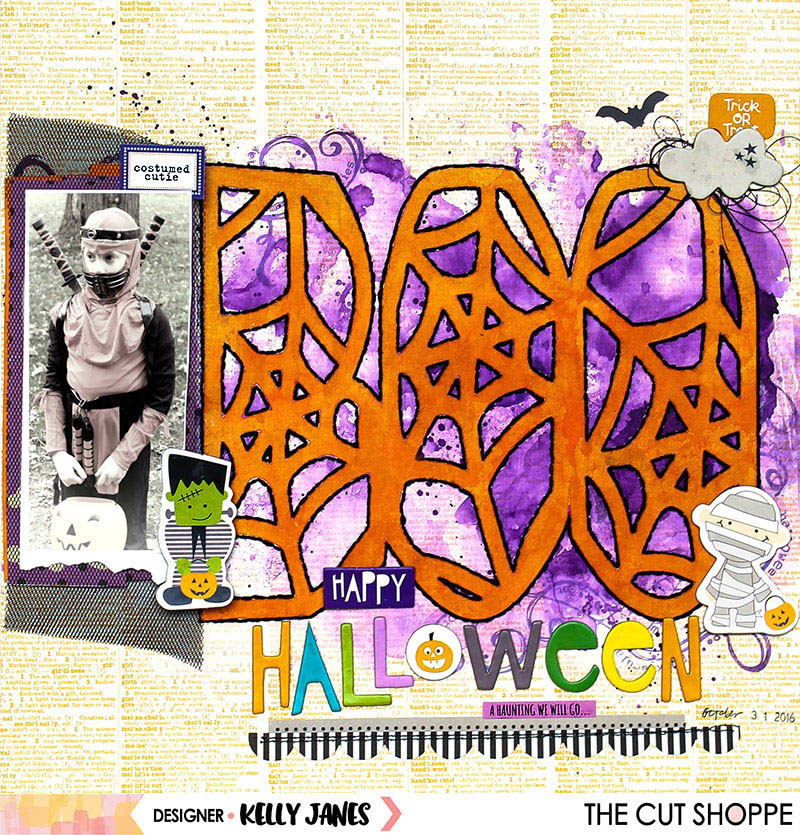
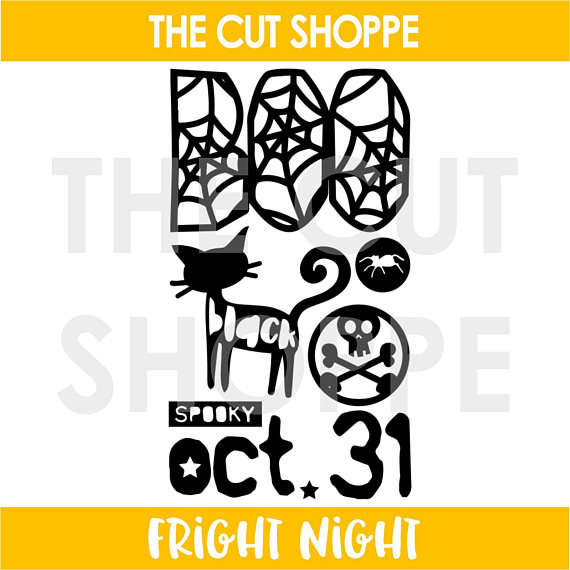
For this layout I used the Fright Night Cut File which was recently released in The Cut Shoppe Etsy Store. I started in Cricut Design Space by slicing out the word Boo from the cut file set. I then adjusted the size of the cut file by unlocking the proportions and stretching the cut file so it would be the same length as my photo. After I had the image sized to my liking, I cut the image on a piece of orange patterned paper from an older Fancy Pants Collection.

I kept the cut file on the cutting mat, added a layer of Clear Gesso, and used a combination of the Illustrated Faith-Shanna’s Favorites-Watercolors and the Prima Tropical Watercolor Confections to add a little more depth to the orange patterned paper. As that watercolor was drying I moved onto the background of my layout. I grabbed a Halloween tiny text print patterned paper from a Teresa Collins Collection (from 2011!!!), added a layer of White Gesso to blend out the background, and used a bright purple watercolor from the same Prima Tropical Watercolor Confections.

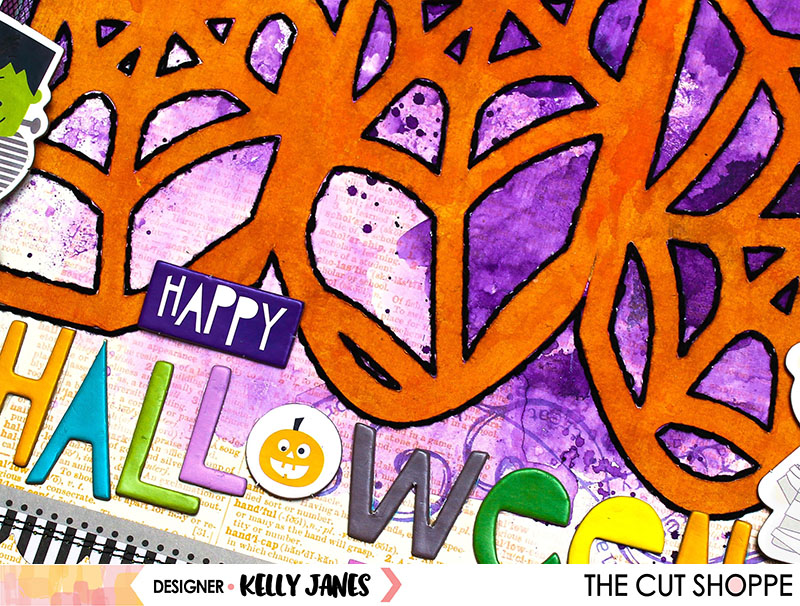
I wanted to add a little something more to the purple watercolor so I grabbed my Tim Holtz Stamp Platform, a long retired CTMH Halloween Stamp, and the retired CTMH Gypsy Ink. I stamped in the corners of the layout to give the appearance that the stamp was coming out from the edges of the watercolor. I really love the detail this stamp added to the layout even though a lot of the stamped image ended up getting covered up by embellishments.

I love how the orange Boo pops off the purple watercolor, but I wanted that word to really stand out from the background. So I added hand stitching using black embroidery floss around the entire cut file image. I love the defined edge that the hand stitching gives this title!

I then moved on to my photo layers. I grabbed a couple cut apart sheets from the Simple Stories Frankie & Friends Collection, black tulle, and White Cardstock to create the layers behind the photo. I used my Close To My Heart Mini Stapler to hold all of the layers together as I was working.

I then moved onto my favorite part of every layout….the embellishing. I grabbed a chipboard sheet from the Bella Blvd Halloween Magic Collection and used the cutesy Halloween characters, the words ‘Happy Halloween’, and the gray cloud at the top of the layout. I also used multiple stickers from the Bella Blvd 12×12 Spooktacular Sticker Sheet and a Designer Clip from the same Spooktacular Collection. For final touches I added tangled black thread under the cloud and a couple lines of machine stitching through the stickers at the bottom of the layout.

Now you can take a look at my YouTube Process Video that includes a Cricut Design Space tutorial.

I’ve said it before and I’ll say it again…Halloween is by far my favorite holiday to scrapbook! Ashley has so many fun Halloween cut files in The Cut Shoppe Etsy Store! Be sure to stop by to check out all of the great designs!

This blog post contains compensated affiliate links. This means I will receive a commission (at no cost to you) from items purchased from those affiliate links.

Workin’ Hard or Hardly Workin’

It’s time again for another Blog Hops with Heart Blog Hop! This month we are featuring a Workin’ Hard or Hardly Workin’ theme and I’m kicking things off! Be sure to make your way around the entire blog hop by clicking the link at the bottom of my post.

Andy and I were so fortunate and asked to attend the Great Lakes Association of Orthodontists conference this year in New Orleans. The doctor I work for, his wife, my office manager, her husband, Andy and myself headed off for a long weekend in New Orleans! Neither Andy or myself had ever been to New Orleans and it was such a fun experience! The theme for this month’s hop fit in perfectly with our trip because the trip was both for work and for pleasure!

I started by cutting The Trendy Trellis Background Cut File from The Cut Shoppe on a sheet on White Cardstock. I then backed a few areas of the cut file with patterned paper from the Pink Paislee – Paige Evans – Take Me Away 6×6 Paper Pad. I stitched each of the trellises on my yellow cardstock background to ensure they would stay attached to the layout. I loved how adding the stitching straight down the center of the cut file images allowed the leaves to lift naturally off the page. This added so much texture and dimension to the layout!

Then I moved onto my photo. This photo was taken when Andy and I were walking around the French Quarter. I loved the brick buildings with the terraces and all the flowers and ferns. I added tissue paper behind the photo to help separate the photo from the background. Then I tucked in numerous die cuts from the Pink Paislee Paige Evans Take Me Away Ephemera Pack. I also added one of the Epoxy Paperclips to the bottom of the photo and a few chipboard pieces from the same Pink Paislee Collection.

I really, really struggled for a title. I tried numerous Thickers alphas, phrases from the Pink Paislee – Paige Evans – Take Me Away Thickers and more. I finally settled on spelling out ‘New Orleans’ directly on the photo using pink glittery letters from Heidi Swapp Memory Planner Stickers, but that just didn’t feel like enough. I ended up grabbing the phrase, Take Me Away, from the PP Take Me Away Thickers. This phrase started as gold, but I felt like it was just too bold. I’ve seen Paige Evans alter these phrases in her YouTube Videos with acrylic paint, so I thought I’d give it a try. TBH, I have 2 sets of these Thickers which helped with my bravery! HA!

I applied a layer of White Gesso to the phrases first. The texture of these letters is very slick so I thought by adding gesso to the letters first it might help the paint stick better. After the gesso was dry, I added multiple layers of white acrylic paint-allowing each layer to dry before applying the next. I had really wanted to add mixed media to the background of this layout (and I did have 2 failed attempts! HA!) but I ultimately decided on just adding white acrylic paint splatters to the background.

I have a process video for this layout and will be posting it soon! Be sure to check back here or subscribe to my YouTube Channel so you don’t miss it!

I hope you’re finding inspiration on our blog hop! Be sure to head to Stephanie Davis’s Blog next! I can’t wait to see what she’s created!

This blog post contains affiliate links. This means I will receive a commission (at no cost to you) from items purchased from those affiliate links (Amazon, scrapbook(dot)com, and Close To My Heart)
.