AHSC #162

I’m back again with another card for Atlantic Hearts.

CTMH Teacher Appreciation, Heidi Swapp-Minc

My son’s last day of school is Thursday and I wanted to send the teacher a thank you & a little gift.

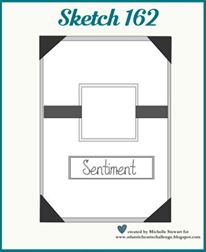
I started with a top folding white cardstock card base and added a layer of gingham patterned paper from my stash. I then used Cricut Design Space & an image from the CTMH Artbooking Cricut® Cartridge to create the rectangular background with the triangles cut on vellum. Knowing this was a card for my son’s teacher I wanted to keep is school themed so I cut an apple using the Artbooking Cricut® Cartridge on Heidi Swapp toner paper and ran it through my Minc using Rose Gold Foil. I’m not sure why an apple is considered the universal symbol for a teacher?!? I added a banner using CTMH’s Black Glitter Paper behind the foiled apple. {I want to take a moment to talk about CTMH’s glitter paper! This is the only glitter paper I’ve found that I can run through my Cricut or through my Big Shot & not have the glitter flake off! It really is super high quality & cuts so beautifully!!! There is quite a selection of colors so check them out if you haven’t already!!} I then heat embossed the sentiment from the Teacher Appreciation Stamp Set in Zing Black Glitter Embossing Powder. I don’t own vellum tape runner adhesive so I added hand stitching around the border of the vellum. CTMH’s Stitch Guide really helps in getting the holes spaced evenly & straight! To add another element of white to the card I scattered a few White Enamel Stars.

CTMH Teacher Appreciation, Heidi Swapp-Minc

I hope you’ll head over to Atlantic Hearts Sketch Challenge and enter your papercrafting project based off sketch #162!

AHSC162

Thanks for stopping by!
-Kelly

Hello Dapper Boy

Hey everyone!! I have another layout and process video to share with you today!

Hip Kit Club Cut File, Shimmerz Paints, Minc Frame & lots of brads!!

I started with a white/green patterned paper from Pink Paislee Citrus Bliss Paper Pad. I applied a layer of clear gesso & added No Yoking Coloringz from Shimmerz using a brayer and the packaging technique. The brayer inspiration came after seeing a process video by Kim Watson on the Hip Kit Club Instagram feed. Using a brayer is a great way to get mixed media onto your layout in a controlled way, but I got slightly impatient and ended up using the packaging technique towards the end!!

Hip Kit Club Cut File, Shimmerz Paints, Minc Frame & lots of brads!!

Once the color had dried I moved onto my photo mat. Now this layout is a true “scrap your stash” layout because every single piece of paper used has been in my stash for over a year! YAY! There is something about using products from your stash…like it’s accomplishment! ha! Now because so much of this has been in my stash for so long I don’t remember all of the manufacturers. I do know that a couple of the pieces are from Amy Tangerine’s Finders Keepers Grab Bag Kit, a Heidi Swapp frame that I Minc’d using Mint Foil, Tim Holtz ticket tags, and a doily from my stash. I matted my photo on a scrap piece of white cardstock to give a little separation from the layering.

Hip Kit Club Cut File, Shimmerz Paints, Minc Frame & lots of brads!!

The title comes from a cut file from the Hip Kit Club & is cut on two different patterned papers. The orange paper is from Pink Paislee’s Citrus Bliss collection & the wood grain paper is from my stash.

I have an Iris container full of paper that I can use portions of for cut files or photo mats. This particular wood grain patterened paper had a doily & florals printed in one of the corners and it just wasn’t my style, but ¾ of it was just woodgrain. I know I would never use the paper as a whole sheet because the doily/florals are not my style, but I knew I could get good use out of the woodgrain!

Hip Kit Club Cut File, Shimmerz Paints, Minc Frame & lots of brads!!

I layered the two cut files together and by using the “contour” feature in Cricut Design Space I cut out the negative pieces of the h, e, l’s, & o. I’ve layered my titles together previously to create a bit of a shadow & was inspired by a recent Missy Whidden process video to give this technique another go!! By layering the two papers & filling in the negative spaces of the letters it draws more attention to the title and helps keep it from fading into the background patterned paper.

Hip Kit Club Cut File, Shimmerz Paints, Minc Frame & lots of brads!!

I added a lot of embellishments using My Mind’s Eye enamel dots & Chalk Studio chipboard pieces, Teresa Collins-He Said, She Said brads, a Prima burlap flower & stickers from a random sticker sheet from my stash. I added a small piece of woodgrain patterned paper in the upper right hand corner and also random stitching in both corners of the layout.

Here’s a YouTube process video showing how all of this came together!!

Thanks for stopping by!!
-Kelly