I’m CRUSHing

So I finally dove into one of My Crush™ Books earlier this year {click here for the original post} and I’ve been creating  CRUSHing ever since!!!

One of my goals for 2015 is to make one new recipe each week. I’m currently working on a mini album using the Year>>Noted Kit to jot down my goals for year and also to include photos as I turn those goals into achievements. BUT  that mini album is too small to include all the recipes I make.

CTMH: Modville Crush Book

I’m dedicating two pages in the My Crush™ Modville Book, but I don’t quite have the second page designed yet! My kiddo’s birthday party is today at school and his birthday party with his grandparents, aunts, uncles and cousins is tomorrow in our home. Needless to say there are multiple cupcakes to be baked and a house to clean! I do have some fun ideas including Flip Flaps™ for the second page of this layout….but I’ll have to show you more on that later!!

CTMH: Modville Crush Book

CTMH: Modville Crush Book

Products Used:
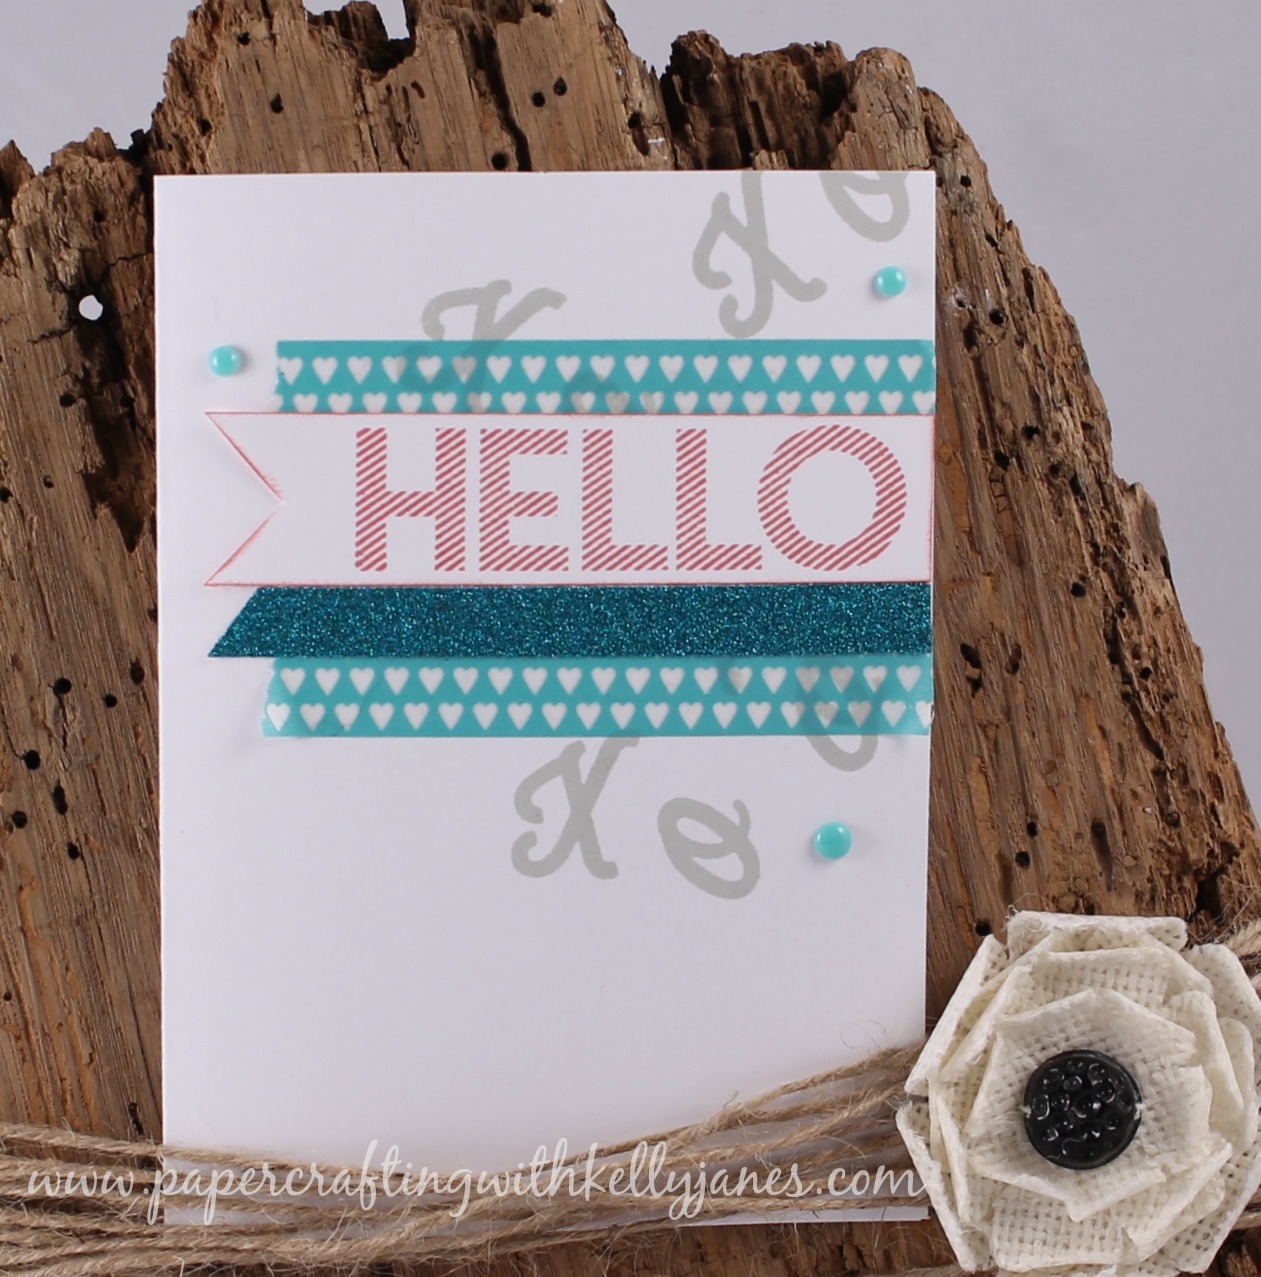
Paper: My Crush™ Modville Book; Whisper CardstockHoney Cardstock; Ruby Cardstock
Ink: Black Exclusive Ink™; Ruby Exclusive Ink™; Whisper Exclusive Ink™
Stamps: Hopscotch Alphabet Stamp Set; Practical Planning {Hostess Exclusive} Stamp Set; Notice The Details Stamp Set {retired}; Year>>Noted Stamp Set {only available through January 31}; LOL Stamp Set; March 2015 SOTM, Choose Happy {available March 1-31 2015} Keyboard Uppercase Alphabet Stamp Set
Other: Ruby Chevron Washi Tape; Honey Triangles Washi Tape; My Crush™ Besties Assortment; Journaling Pen; Triangle Border Punch; Silver Shimmer Trim

Happy Friday!
-Kelly

Hello!

CTMH: January SOTM

For today’s post I have two cards to show you! The first card is based off this sketch by Studio Calico. I stamped the X’s & O’s from January’s SOTM, This Moment, in Whisper Exclusive Ink™ directly on the card base and the “Hello” sentiment from the same stamp set on a scrap piece of White Daisy Cardstock in Hollyhock Exclusive Ink™. I then dovetailed one end of the white cardstock and I used a Sponge Dauber and Hollyhock Exclusive Ink™ along the edge of the white cardstock to add a little definition. I grabbed the Lagoon Hearts Washi Tape & Teal Shimmer Trim and started layering the washi, white cardstock, and shimmer trim. I finished the card off by adding a few Aqua Dots.

CTMH: January SOTM

{Now let me give you a tip….The X’s & O’s come together as a pair of 4. To make the stamping simpler I cut apart the XOXO stamp. I know some of you are gasping at the thought of cutting your stamps, but it really is okay as long as you are very careful. Cutting them makes it much easier than masking and if you want to use the whole sentiment-you just butt the cut lines back together and violá–it’s one piece again! ANOTHER TIP…rather than using 2 pieces of washi to get the width that I would need in this card, I used my Non-Stick Micro-Tip Scissors and cut a single strip of washi into two pieces. This way it cuts the amount of washi tape you will need by half. Now if you are only making a single card then you may want to skip this step, but if you are making a bundle of cards this could be a money saving tip! The Non-Stick Micro-Tip Scissors are also super handy because the washi will not stick to the blades of the scissors!!}


For the second card, I stumbled upon this card on Valentyna Komisarenko’s blog and LOVED it! The card she created is absolutely gorgeous and she is a super talented papercrafter!! For my card I used VersaMark™ with the Geometric Backgrounds Stamp Set & the Doodled Designs Stamp Set {which includes the star, 3 small dots and the circle*}, I sprinkled & melted Gold Embossing Powder onto the Outdoor Denim Cardstock to give it some shine. Next I grabbed a scrap piece of White Daisy Cardstock and stamped the circle {again from the Doodled Designs Stamp Set} and the sentiment, from the Wish Stamp Set, using the same heat embossing technique. I love all the shine on this card, but I wanted to add a little dimension so I randomly placed a couple Durables Triangle Studs on the card.

CTMH: Doodled Designs & Wish {inspired by Valentyna Komisarenko}

{ *I have one final tip- the great thing about polymer stamps is they are pliable. The Doodled Designs Stamp is a circle, but for the background on this card I squeezed the stamp to create more of an oval shape before placing it on my acrylic block. Unlike rubber stamps, polymer stamps can be manipulated [curved, squeezed, reversed, etc]! Don’t be afraid to experiment. The stamps will bounce back to their original shape.}

CTMH: Doodled Designs & Wish {inspired by Valentyna Komisarenko}

PS: How great are those adorable wood displays?!?! I picked those up at a local craft fair this fall. They are designed to be picture frames but I knew they would fit my cards perfectly for pictures!!

Thanks for stopping by!
-Kelly