Hey friends! I have a layout to share with you that I created waaaaayyyyy back in April when The Cut Shoppe sponsored the CSI: Color, Stories, Inspiration Challenge. That month was the Challenge #229 Lemonade Day and a few of TCS Design Team members made layouts that were shared on the CSI Blog. This is the first time I had played along with the CSI Challenge, and I definitely found it to be challenging! Let me give you a little insight to this challenge in case you are not familiar. The challenge consists of a color scheme, a sketch, embellishment prompts and title/journaling prompts. I had great intentions of sharing this layout during my design team term, but time got away from me. I recently came across this layout on my computer and realized I never shared it!! Better late than never, right?!


I used two cut files for my layout today; The Happy Little Clouds Cut File & Let’s Do Summer Cut File. I started in Cricut Design Space by slicing out the words “Summer Lovin” from the Let’s Do Summer Cut File and I also sliced out the solid cloud image on the top left of the Happy Little Clouds Cut File. I duplicated the cloud image and used the contour feature to hide the heart on one of the clouds to create a solid cloud. I then inserted a heart from the shapes tab in Design Space and welded it to the heart in the Summer Lovin’ phrase.
My finished layout was actually my third attempt! HA! My first attempt resulted in a mixed media disaster and my second attempt was a failed hand stitching fiasco. <<You can see both disasters failed attempts in my process video at the bottom of this post.

I started with multiple papers from the Heidi Swapp Serendipity Collection. Anyone remember this collection? It’s been hiding in my stash for years and I obviously loved it because I have A LOT of it! I used a blue patterned paper for my background and then layered two of the beautiful sunny yellow patterned papers for my photo mat. I tore the bottom edge of both of the yellow patterned papers. I also cut a yellow striped frame, from the Heidi Swapp Color Pop Collection, in half and used the frame as part of the photo mat. For additional detail, I tucked in an acetate gray scallop border under the yellow patterned papers.
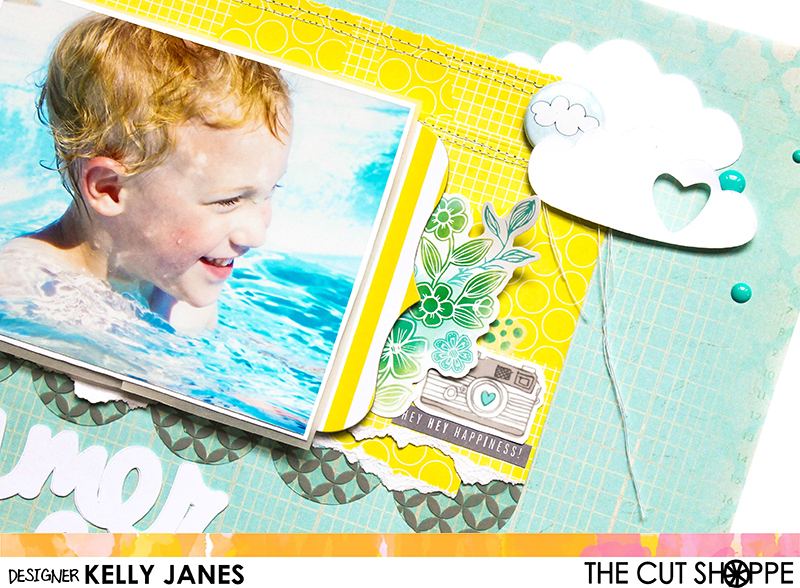

I moved onto the title, Summer Lovin’, from the Let’s Do Summer Cut File. I cut the, Summer Lovin’, title twice and adhered the two sentiments together by slightly offsetting the words to create more depth & interest. Now it was time to embellish, but before I go on I need you to pause for a moment to soak in the cuteness of this kid! My heart is so full of love and breaking into a million pieces all at the same time when I look at this photo of Aidan! He was only 3 years old in this photo (He’s now 9 years old!). I need time to slow down!! To all the mama’s out there, I know you feel me!

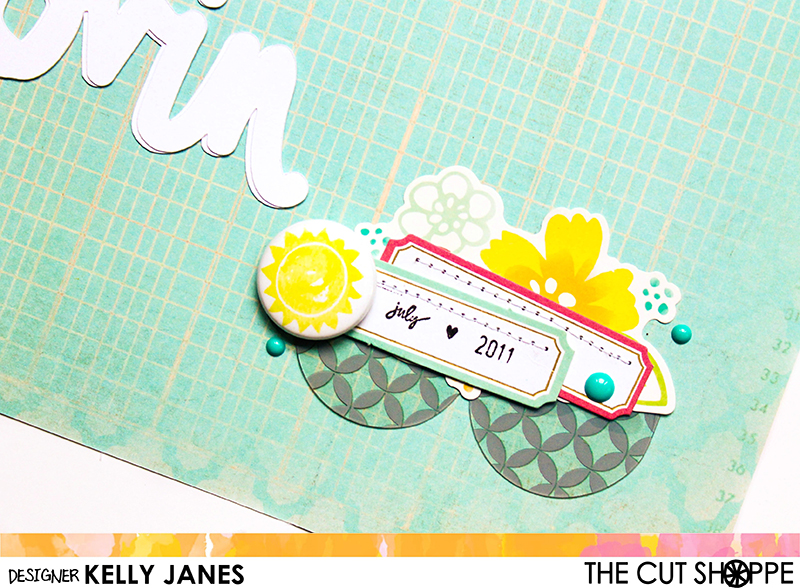
I added two clouds from The Happy Little Clouds Cut File to the top of the photo mat and also a cloud flair button from the Pretty Little Studio Here Comes the Sun Collection designed by Marie-Pierre Capistran. For the area around the photo I added multiple stickers from the Amy Tangerine Yes, Please Collection. I also added a cluster to the right of the title, which is also in the sketch. I wanted to include all of the colors in the layout for this cluster. I used the scrap of the Heidi Swapp acetate border, two labels from the Pink Paislee Citrus Bliss Collection, a floral sticker from the Amy Tangerine Yes, Please Collection, and a sun flair button from the Pretty Little Studio Here Comes the Sun Collection. For final details I added machine stitching to the yellow patterned papers and both of the labels in the lower right corner and tossed in two clustering of enamel dots. I debated on adding splatters, but given this was my third attempt at creating this layout I thought I better not risk it! HA!

So let’s recap…
•The Color Scheme: I was able to incorporate all of the colors. I did add in a little bit of pink & green but I think it falls within the 10% allowance.
•For the “Evidence”: I included a sun (the flair button) & clouds (the cut file images & flair button), solid cardstock (for my title), stripes (in the layered frame & the background patterned paper), something loopy (my title), and flowers.
•For the “Testimony”: I documented a summer photo. I don’t have any journaling for this layout, but there really isn’t a story to go along with the photo. It just a fun, summer day in the pool.
•The Sketch….the sketch…It most definitely wasn’t a direct interpretation but it did inspire me! I used the sketch for photo placement and title placement. I scaled down the torn papers on the sketch and just used the torn papers as part of my layering for the photo mat. I also used the sketch as inspiration to create the extra cluster of embellishments to the right of the title.

Now you can take a look at my process video.
Thanks for stopping by my blog today and even though this particular challenge is over you can still head to the CSI Challenge to play along with the current challenge!


Nice happy and sunny layout..learning new things everyday…thanks
Oh yay! Thank you so much for you sweet compliment! I was really debating on whether or not to re-record the Cricut tutorial because the original video clip disappeared from my computer. I’m hoping you found it helpful! 🙂